Monday, April 22, 2013
Software Repository Up
The software repository is now up and available from Google code here and uses Mercurial. I'll be putting my files in here from now on, and try to do a better job to keep some naming consistency and documentation. That is all for today.

Sunday, April 21, 2013
Wireless photo transmission
Today is a pretty big milestone in my project. Actually over the last few days I've made a lot of good progress, so today's blog post will be a big one.
First the achievement:
I transmitted wirelessly from outdoors to inside. Still a lot of tweaking and streamlining to go, but the rough idea is there. Here is the photo:
To get there, a bunch of work was necessary. To summarize:
First the achievement:
I transmitted wirelessly from outdoors to inside. Still a lot of tweaking and streamlining to go, but the rough idea is there. Here is the photo:
 |
| Fig. 1. The camera took a photo outside, and transmitted it about 6 m to the Arduino indoors. The errors are probably due to missing bits or frames during transmission. |
To get there, a bunch of work was necessary. To summarize:
- Modified my SD card photo storage program to communicate with the Lynxcamera over the UART instead of software serial.
- Programmed my XBee transmitters to work at 38400 baud.
- Connected the Lynxcamera to the XBee and battery module, to capture photos remotely.
After the break I discuss the challenges with each of these separately, include some photos of the setup, and post my code.
Sunday, April 14, 2013
SD card adventures
This morning I went to NCIX and bought myself a microSD card. It was the ADATA 16 GB microsdhc class 10, and worked great with the Sparkfun microSD shield. The card came pre-formatted in FAT32. I found a copy of FAT libraries for the Arduino by William Greiman . After changing the CS pin in the software to be 8 (the software default was 4), the ReadWriteSdFat example code executed perfectly. I was also able to read the test file on my computer.
The next step was to collect a camera image, and store it on the microSD card. To do this, I adapted my previous LynxCamera code to make LynxCamera_SD. In this version of the software, the camera and SD card are both initialized. The user presses a keyboard button to tell the camera to take the photo. This time, instead of streaming the photo to the console, it is logged to the SD card. I can eject the SD card, insert it in my computer and use my conversion script to make it into the beautiful image of my apartment below.

While this works, I have observed a couple disappointments already. Getting the data from the camera onto the SD card is slow. I may be able to update the baud rate slightly, but at 38400 I was seeing transmission errors, so there is not a ton of speed to be gained here. The camera itself is a bit disappointing (though I was sort of expecting this). The photos have poor contrast, and are a bit dark. Seems the exposure time is automatically set, so I don't have a ton of flexibility here. Finally, I'm already at 15508 bytes out of a potential 30720... not leaving me a ton of room for doing LCD screen, radio and push button integration.
But I think there is still lots of potential for this project! I'm charging my battery at the moment, so that, as the next step, I can start integrating the radios into this system. I think I will try to get all the aspects of this project integrated before starting to optimize the speed and space utilization.
The next step was to collect a camera image, and store it on the microSD card. To do this, I adapted my previous LynxCamera code to make LynxCamera_SD. In this version of the software, the camera and SD card are both initialized. The user presses a keyboard button to tell the camera to take the photo. This time, instead of streaming the photo to the console, it is logged to the SD card. I can eject the SD card, insert it in my computer and use my conversion script to make it into the beautiful image of my apartment below.
While this works, I have observed a couple disappointments already. Getting the data from the camera onto the SD card is slow. I may be able to update the baud rate slightly, but at 38400 I was seeing transmission errors, so there is not a ton of speed to be gained here. The camera itself is a bit disappointing (though I was sort of expecting this). The photos have poor contrast, and are a bit dark. Seems the exposure time is automatically set, so I don't have a ton of flexibility here. Finally, I'm already at 15508 bytes out of a potential 30720... not leaving me a ton of room for doing LCD screen, radio and push button integration.
But I think there is still lots of potential for this project! I'm charging my battery at the moment, so that, as the next step, I can start integrating the radios into this system. I think I will try to get all the aspects of this project integrated before starting to optimize the speed and space utilization.
Wednesday, April 10, 2013
Shift register working
Its a minor victory, but its been almost a month since I've had time to work on this project so I'll record it anyway :). Fixed a short to ground on one input pin of the shift register. The I used the Arduino shiftIn() function to read from each pin of the 74HC165. A simple sketch is available here. Hopefully soon I get the DIP switch soldered on, and can start using this as some input into the Arduino for testing and debugging.
Sunday, March 17, 2013
Battery-powered Radio unit
Connected my battery charge-booster and XBee radios together today for a proper radio test, and had some very good results. The XBee was on a regulated XBee Explorer, taking care of the 3.3V signal conversions and power conversion. I connected the power directly to the output of the charge-boost, and then did a loopback test with XCTU (see previous post). The result was great! Over 99.8 % success rate across the room. Couple photos of the setup below.
Eventually the battery powered unit (Fig 1.) will have the camera connected to it, so that the photos will be sent wirelessly.
In Fig. 2, you can just see the other part of the project I have been working on: shift register for my mode switches. The SD card reader shield contains a mini-protoboard which I have been using to my advantage here to hold all my components (8 resistors and an IC). A 90 degree header sticks out on one end, which I will use to connect this shield to my switches. Looks like there is still some room remaining on the protoboard, which will be good for when I add in some other sensors. However I was having a strange result with one of my pull-up resistors, so I'll have to do more testing before I can say that part of the project is ready.
 |
| Fig 1. Battery powered wireless unit. |
 |
| Fig 2. Computer connected XBee unit. The red board in the middle contains some electronics for my DIP switches (pullup resistors and a shift register). |
In Fig. 2, you can just see the other part of the project I have been working on: shift register for my mode switches. The SD card reader shield contains a mini-protoboard which I have been using to my advantage here to hold all my components (8 resistors and an IC). A 90 degree header sticks out on one end, which I will use to connect this shield to my switches. Looks like there is still some room remaining on the protoboard, which will be good for when I add in some other sensors. However I was having a strange result with one of my pull-up resistors, so I'll have to do more testing before I can say that part of the project is ready.
Saturday, March 16, 2013
First Linksprite Photos!
Connected my LinkSprite camera directly to my Arduino to investigate the photo quality and software. I was using the sample software from the Sparkfun product description page. The image streamed to the serial monitor, which I copied and pasted to TextEdit and saved as a .txt file (plaintext). I used the python script from an instructables Bird Feeder project to convert this to a usable jpg file. This I was able to open directly.
During my testing I made a number of observations. Running at 38400 baud between the camera and Arduino was creating some errors (Fig. 1), so I changed to 9600 baud which eliminated the errors (Fig. 2). I also played a bit with the delays in the sample code, and moved some functions around to (hopefully) improve the speed of data transfer. My modified code is available here. Connections to the LynxSprite camera are: +5 and gnd to respective pins on Arduino. TXD to Arduino 4 and RXD to Arduino 5.
Next I will connect and get my radio's working (including my battery powered radio unit) and test out some wireless photo transmissions.
During my testing I made a number of observations. Running at 38400 baud between the camera and Arduino was creating some errors (Fig. 1), so I changed to 9600 baud which eliminated the errors (Fig. 2). I also played a bit with the delays in the sample code, and moved some functions around to (hopefully) improve the speed of data transfer. My modified code is available here. Connections to the LynxSprite camera are: +5 and gnd to respective pins on Arduino. TXD to Arduino 4 and RXD to Arduino 5.
 |
| Fig. 1. Some transmission errors cause image to appear improperly (due to jpg encoding). Transfer rate: 38400 baud |
 |
| Fig. 2. No transmission errors noted at 9600 baud. |
Monday, March 4, 2013
Radio Testing
I bought my XBee radios over 3 years ago, but never actually got them working. I've been playing around a bit with them in my lab, and happened to come across a document explaining that an Arduino with XBee shield running an empty sketch can play the role of an XBee Explorer so decided to try it out. I hooked up a loopback circuit on my reciever, and used the digi X-CTU software to run the test. Results were flawless! Had my XBees up and running in less than 10 minutes talking across a rather small gap... will do some proper range tests once I get the battery and stuff sorted out.
Interestingly it seems the antennas are not required for communication... the u.fl connector alone can support some degree of signal at least over the short range tested. (As a side note, I got the antennas from ebay for about $5 including shipping). But unless I run into mass restrictions, the antenna will stay for now... at worst I can always take off the plastic casing and keep the wire whip.
In other news, I'm getting ready to defend my thesis so I'm not planning on ordering parts anytime soon... but defence date is in 2 weeks so... more electronics in the near future? I think so!
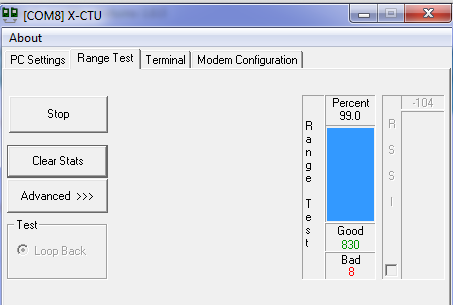 |
| 99% Success rate!!! |
 |
| Test setup showing my not-quite overlapping-antennas |
In other news, I'm getting ready to defend my thesis so I'm not planning on ordering parts anytime soon... but defence date is in 2 weeks so... more electronics in the near future? I think so!
Subscribe to:
Posts (Atom)